
I can recommend 5 important steps to follow when starting a Kitchen refurb. Kitchens that are big or small will all have three essential items
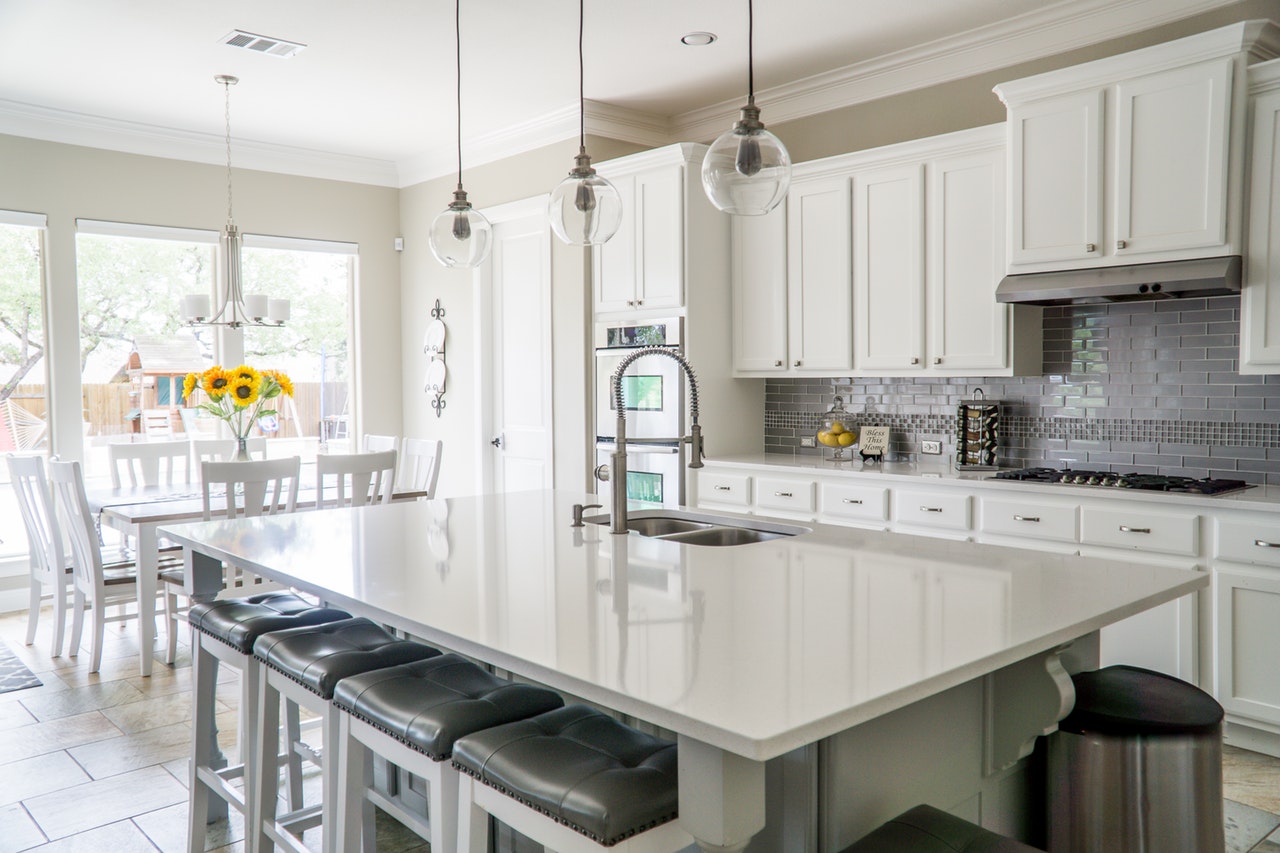
for it to function properly, the sink, the cooker, and the fridge. To me, everything else is secondary. It is best to position them using the “work triangle concept”. This just means that you should position them as farther apart from each other as possible, then fill everything else you need in between.
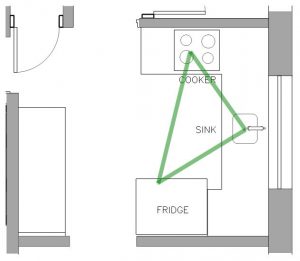
The example below shows the Work triangle concept on a small to medium kitchen.
Where do I start my Kitchen design? Below are the 5 steps that I use and you can follow:
Step 1: Make a list in order of importance, all the things that you need in the kitchen. Obviously, if you have a small space you cannot put everything in there. We are looking for the right balance of essential equipment and adequate counter space and cupboard space. This is the list that I made for my own kitchen.
- Sink – a must
- Big Fridge – a must
- Cooker – a must
- Oven
- Adequate counter space for food prep, and counter equipment like, toaster, coffee machine etc.
- Adequate cupboard space for cutlery, and dinnerware, and pots
- Microwave
- Washing Machine (clothes)
- Dishwasher
- D̶r̶y̶e̶r̶ ̶(̶c̶l̶o̶t̶h̶e̶s̶)̶
Because of limited space and I had to let go of the dryer and decided to go for a Washing machine with a Tumble dryer instead.
Now if you have a kitchen designer, all you have to do is give him this Step 1 list. If he is experienced enough, he will be able to figure out the rest for you.
Step 2: Planning. Here in the UK, it makes sense to position the sink on an exterior wall, usually in front of the window then layout the other equipment with careful consideration of their functionality. This is where you should also consider existing services if you are trying to save a bit of time and money.
- Sink – if you have a window, I will place it in front of it. Use double sinks if space allows.
- Cooker – There are quite a few types out there, like gas cooker, ceramic, induction, etc. Make a choice depending on functionality, energy efficiency, services availability, and outright cost.
- Hood extractor – I prefer the hood extractor that blows air outside, hence I will try to position it with the intention of having ducting to go through the exterior wall.
- Oven – this is usually placed under the cooker. I would like it to be at a higher level, but I just don’t have space.
- Fridge – because I want to have a big American fridge, I will just position it where it’s convenient to use, keeping in mind the “work triangle concept”. My fridge will need waterline for the built-in ice machine. And of course, a power socket to plug into.
- Dishwasher – preferably, this should be close to the sink, just because you need to water down some dishes before they go in the dishwasher. It also can tap into the drain of the kitchen sink.
- Counter space for equipment – you have to make sure that you have adequate power sockets for this. Nothing is more annoying than unplugging and plugging kitchen equipment just because you do not have enough sockets in place.
- Cupboard space – fill everything else in between with cupboard space, you cannot have too much of this. Kitchen units come in standard sizes of 600, 500, 450, 400, 150mm. Not all of them are available in all carcass brands, so look into your space and make sure they look right.
Step 3: Budget. Think about how much you are willing to spend on the kitchen. If you are slightly over-budget, tone down the finishes and equipment below. Maybe you do not need all the bells and whistles.
If a builder will do this for you without an Interior designer, make sure you protect yourself, do your own price research to get a rough idea of cost. I always evaluate a quote from the contractor for my clients to make sure they are not ripped off.
Step 4: Finishes. There are thousands to choose from, but here are some tips to narrow it down.
Countertop – To me, it is best to use dark natural stone, white marble looks great, but be careful as they can get stained by red wine or similar coloured food. The floor can be the same finish as the countertop.
Backsplash – This is the finish to the wall above the counter. For this, I prefer to use coloured glass, or maybe even glass mosaic. Depending on your taste or the overall theme of your house. Be careful not to use mosaic behind the cooker as it may become too tedious to clean.
Cupboard doors – choose a door to suit the style of the kitchen you want to go for, the handle style and finish are also quite important to the styling of your kitchen.
Sink finish – usually this is in brushed Stainless steel, but you can also buy a white metal sink, a ceramic or composite.
Appliance – at this stage, also remind yourself about the colour and finishes of your appliance
Power socket / Light switch – because these are a very prominent part of the kitchen, make sure they are the finish that matches your overall styling.
Step 5: Lighting: How will you light the space? Choose the main light that works for you, also consider lights under your wall units towards the counter.
————
Try to invest in good brands of kitchen equipment for the reliable and trouble-free household. These are brands that I used in the past, models and brands vary in price range:
The above items are very useful, but they are not everything you have to know about designing a kitchen. If you think the above items are useful but you still need someone with expertise that will guide you through the pros and cons, please consider hiring us! We are a London based Interior Design company and we can design your kitchen. Contact us!
XDesignStudioUK